I bought a set of labels online, but I decided I didn't like them much and they were challenging to customize, so I made my own one day. And, because I like to share all the good things that come out of my classroom, I am sharing my creation with you.
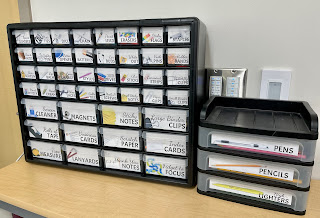
I bought the large box on the left, but the drawers are only 5-6" deep, so I needed another solution for pens and pencils. I already had the shorter box on the right. It was stuffed with a hodgepodge of other things that fit well in the larger box, so reorganization worked in my favor.
The availability on the large box I bought fluctuates. Sometimes it is only available with a red front edge. (And right now the price is higher than I paid. It might be worth waiting because the price fluctuates a lot on these. $30-$40 is the reasonable range.) There are lots of drawer combinations, though. This one is all bigger drawers, this one is all small drawers. Get what works for you.
This is a box similar to the smaller one I use for pens and pencils. (Also worth price watching as it ranges from $12-25 and fluctuates a lot.)

These are the Google slides I made for my labels. Click "Use Template" to get your own copy of the slides. They are free. Note that these can be challenging to get the images to print correctly. I had to download them as a PDF and print using Adobe. The trick was to click "print as image" in the advanced settings. Printing directly from Google created black boxes in place of some images.
I found lots of suggestions online about the best method to tape the labels onto the drawers. And lot of debate about wether it was better to stick labels on the outside or the inside of the drawers. After considering lots of tape and glue options, I remembered that Avery makes full sheet labels and I had some handy. I simply printed my slides to these full sheet labels and then cut them to fit my drawers. After six months they are still sticking just fine.
Some people like to paint the box. That was a little too much work for me and I liked the black anyway. Also, I was not confident that painted plastic would handle the wear and tear of a classroom.
I made a conscious decision that I wanted my toolbox to be easily accessed by my co-teacher and students, so I didn't include items that were just for my personal use.
So far, I totally love my toolbox. The little bits we need to keep things on track are accessible, and my other drawers are more organized without all these little parts taking up space. If you make your own share a picture in the comments or on Twitter. I'm @JenRoberts1.
*Note: The links in this post are affiliate links. I earn a very small percentage of your purchase, but the item price to you is the same either way. The slides are shared freely. The Chrome extension I love for showing me how the prices of Amazon items fluctuates is called The Camelizer. It will usually show you the graph of how an item's price has changed over time. You can also use it to set a price watch and it will email you when an item drops below your preferred cost.
Comments
Post a Comment
Thanks for your comment on this post. If you have an urgent question you may want to reach out to me on BlueSky @jenroberts.bsky.social.
Comments on this blog are moderated for posts more than five days old to cut down on spam, so if you are commenting on an older post it may not appear right away.
If something here helped you, feel free to donate $5 toward my classroom library at https://www.buymeacoffee.com/jroberts1